DIY: How to correctly and quickly install a bathroom vanity
Source: Lion Stone Works - Marble And Granite (lionstoneworks.com)
Introduction
If you’ve ever dealt with a bathroom renovation, you know it’s no walk in the park—especially when it comes to replacing an old vanity. Get ready for unpredictable plumbing, rusty fasteners, and the real possibility of hidden "surprises" under that old sealant layer.
So take a deep breath, gather your patience, and yes—you can install a bathroom vanity yourself without hiring a pro or overspending! The key is knowing the sequence, understanding what might go wrong, and being ready for a bit of a plumbing puzzle.
In this article, I’ll show you how to install a bathroom vanity quickly, correctly, and without unnecessary stress. We’ll go from removal to water hookup, break down the tools you’ll need, point out hidden pitfalls, and discuss when it’s smarter to call in a professional.
What You Need to Know If This Is Your First Time Installing a Bathroom Vanity
When people talk about installing a bathroom vanity, they may mean very different tasks. Sometimes it’s a full replacement. Other times, it’s only a sink or countertop swap.
Full replacement This involves removing the old cabinet, installing a new vanity base, securing it to the wall, mounting the countertop and sink, and connecting water supply lines and the drain. This scenario is most common during renovations or full bathroom updates.
Partial replacement This includes replacing only the sink without changing the cabinet, or installing a prefab vanity set with a built-in countertop and basin. Some steps are simplified, but accurate measurements and proper sealing are still essential.
What to Prepare Before Installation
Source: @creativemarket (Pinterest)
Before you loosen a single screw, make sure you have everything you need. Installing a bathroom vanity isn’t just “putting a cabinet and sink together.” Precision, measurements, and the right tools matter—especially if you want the final result to look sharp, work flawlessly, and last for years.
Tools and Materials
Here’s a basic toolkit you’ll need for a bathroom cabinet installation:
Level – to ensure the vanity is perfectly horizontal;
Tape measure – for accurate wall and plumbing measurements;
Hammer drill or regular drill with tile/masonry bit;
Screwdrivers (Phillips and flathead) and an adjustable wrench;
Sealant, silicone, and adhesive for attaching the sink (what adhesive to use to attach sink to vanity)– go for water-resistant types;
Flexible water supply lines;
P-trap and drain connection kit;
Anchor bolts or screws with wall plugs for securing to the wall;
Soft cloth, gloves, utility knife.
With this list, you can confidently walk into any major home improvement store—like Lowe’s, Home Depot, or Menards. Staff there will easily help you find compatible parts for your vanity and even assist with measurements and adapters.
Measuring and Space Planning
Before buying a new vanity or starting installation, make sure to:
Measure the distance between your water supply and drain lines—these must align with your new vanity design;
Check for level floors and straight walls—especially important in older homes where shifts of several inches aren’t unusual;
Consider vanity depth so it doesn’t block plumbing access or interfere with the shower door.
If you’re installing a unit with an integrated countertop and sink, things get easier.
Step 1: Removing the Old Vanity
How to replace a bathroom vanity:
Shut off the water – close both the hot and cold shut-off valves. If you don’t have any, turn off the water supply to your entire home.
Disconnect the water lines – unscrew the flexible hoses from the faucet. Gloves and a towel help here, since water almost always remains in the lines.
Take apart the P-trap – unscrew the bottom section and place a bucket underneath. Be gentle with plastic fittings—they’re prone to cracking.
Unscrew vanity fasteners – most are anchored with screws or bolts into the wall. Use a drill or screwdriver.
Remove the countertop and cabinet – if it’s a drop-in sink, carefully cut through the old silicone with a utility knife.
Check the wall and floor – clear away debris, adhesive, and dust. Use an antiseptic solution if needed.
If you run into surprises (like tile damage or rusted pipes), be ready to do some minor repairs before moving forward. The next section will help you get set up for success.
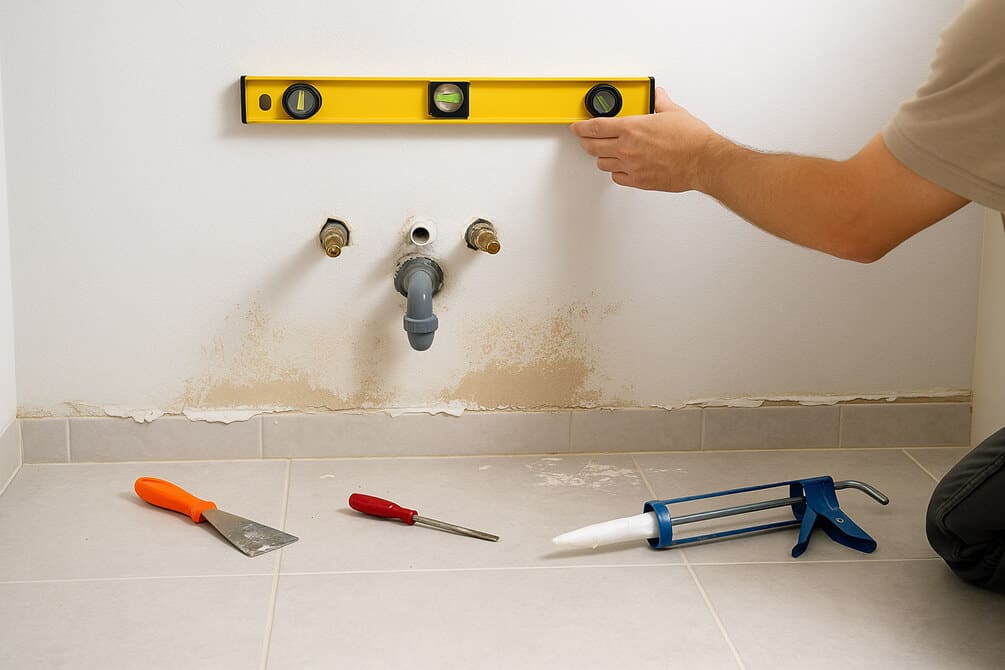
Step 2: Preparing the Installation Area
The old vanity is gone—and now you’re left with a bare wall and floor that need proper prep. This is where the small stuff matters most. From tile alignment to pipe condition, everything you do now sets the stage for a smooth installation.
Don’t rush. Stats show that most vanity issues stem from skimping on prep work.
What to do before installing:
Scrape off any old sealant or adhesive. A utility knife and rubbing alcohol work well for full removal.
Examine walls and flooring. If tiles are loose, cracked, or show water damage, fix these issues first. Even premium vanities can’t anchor securely to weak or damp surfaces.
Check for level floors and plumb walls. Use a level. Even 2–3° of tilt can cause drainage issues or countertop misalignment.
Apply antiseptic treatment. If you notice dark grout lines or a musty odor, you might have mold.
Pro tip: I once installed a vanity where everything went smoothly—until I realized the wall was completely crooked! I had to improvise with spacers on the spot. Always check the little things. It only takes a minute to use a level, but it can save hours of frustration.
When to stop and call a pro:
If you see any of the following:
Rusted pipes;
Unusual pipe placements;
Mold or wet spots behind the vanity;
Loose or bouncy floor tiles;
Ask yourself honestly: how hard is it to replace a bathroom vanity? It depends on your tolerance for side projects. Sometimes, calling a plumber or contractor is the smartest—and cheapest—move.
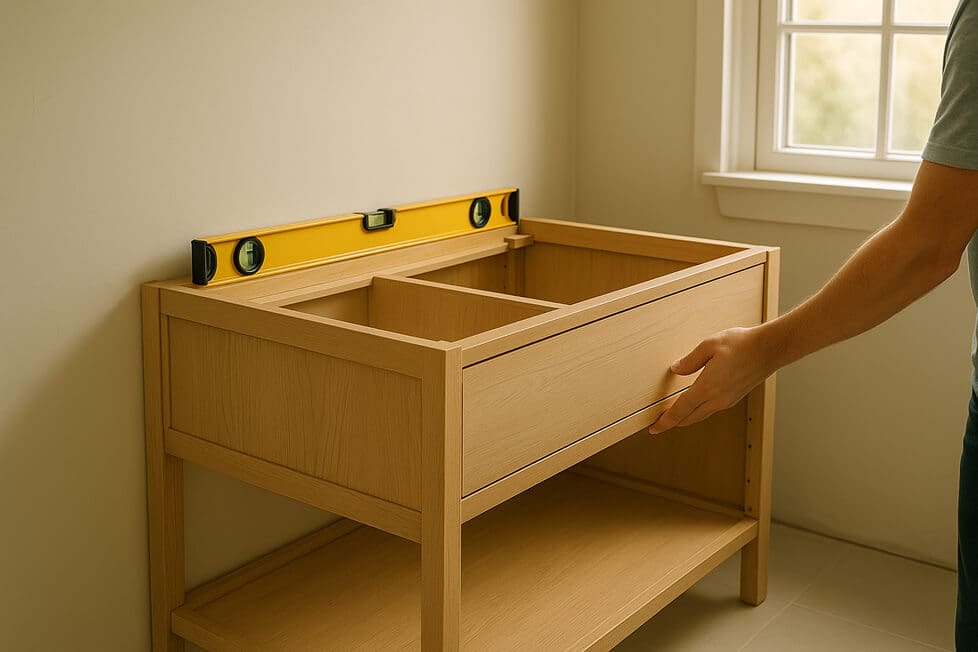
Step 3: Assembling and Installing the New Vanity
Assembly and installation. You’re not just screwing parts together—you’re anchoring a structure that shouldn’t wobble, peel, or leak.
Installing a new vanity:
Build the frame. Most come flat-packed. Assemble per instructions, check for square corners, and make sure it’s sturdy.
Position it in place. Use a level. Even slight tilts can ruin drainage or misalign the countertop.
Anchor to the wall. Use the rear mounting holes and secure with anchor bolts or screws with wall plugs. Check alignment with a level.
Tip: If you’re installing a bathroom sink cabinet, make sure the back panel doesn’t block your water lines or drain pipe. You may need to cut or notch it for clearance.
Common mistakes to avoid:
Even if you're following the instructions step by step, here are a few common pitfalls that are easy to overlook:
Incorrect P-trap height. You install the vanity—and the drain doesn’t align. You’ll be hunting for extensions or adjusting pipes.
Vanity is tilted. Doesn’t seem like much, but off-level countertops lead to pooled water or door misalignment.
Not anchored. Even snug against the wall, a free-standing vanity will shift with every drawer pull. That leads to loose hinges over time.
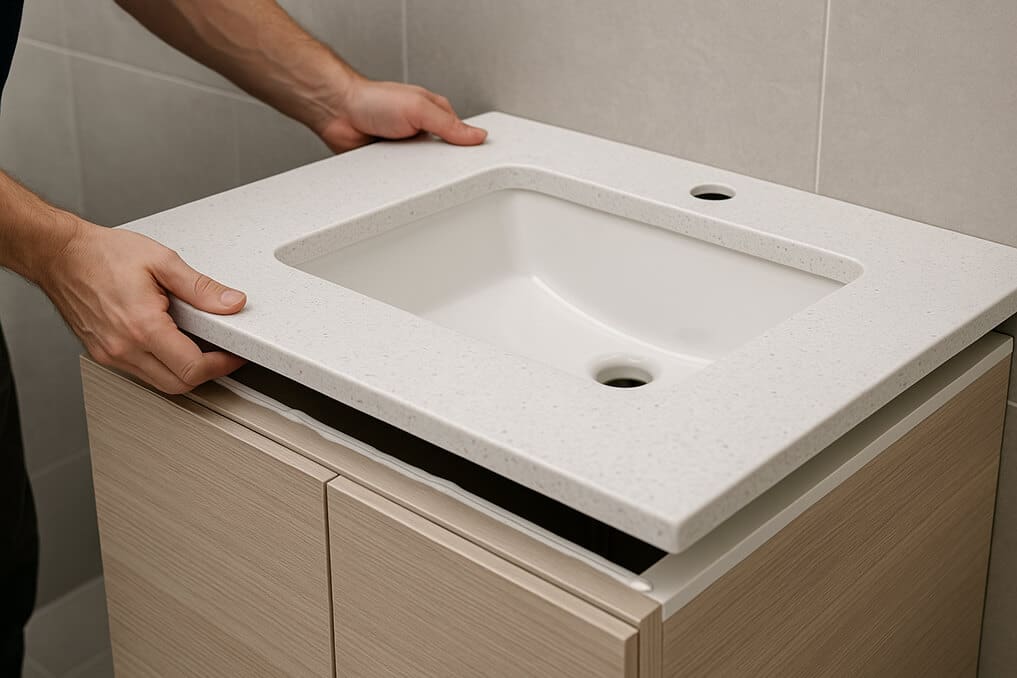
Step 4: Installing the Countertop and Sink
Now that the vanity is in place, it’s time for the most visible part—the countertop and sink. Precision and sealing are critical here: it’ll determine whether moisture sneaks in and how long your vanity lasts. Speaking of sealing, remember your countertop may need sealing too—especially if it’s granite. More on that in the article “Do Granite Countertops Need Sealing? Busting Myths and Providing a Clear Answer.”
How to attach vanity top
If your model comes with a separate countertop:
Dry fit the top—no glue or sealant. Check that it sits evenly, with no tilts or gaps.
Degrease both surfaces: top of vanity and underside of the countertop.
Apply adhesive or sealant around the edge and support points. Use water- and temperature-resistant products.
Gently set the top in place and press lightly. Don’t slide it—this can smear the sealant.
Wipe away excess silicone immediately.
Tip: If the countertop overhangs a bit—that’s fine. What matters is that the back edge is flush with the wall. You can run a bead of silicone along the wall to prevent water intrusion.
How to attach sink to vanity
Mounting style depends on the model. Common options include:
Mounting clips – metal brackets that hold the sink from underneath. Often included, but require precision.
Sealant or adhesive – ideal for drop-in sinks. Apply generously around the opening.
Combo – using both clips and sealant for added security.
After placing the sink, always seal the joint with silicone around the edge. This is where moisture—and eventually, mold—loves to collect.
To ensure a secure fit, you need to know not just how to secure a sink to a vanity, but how to do it neatly. Avoid gaps, especially at the front edge—splash zones are prime trouble spots.
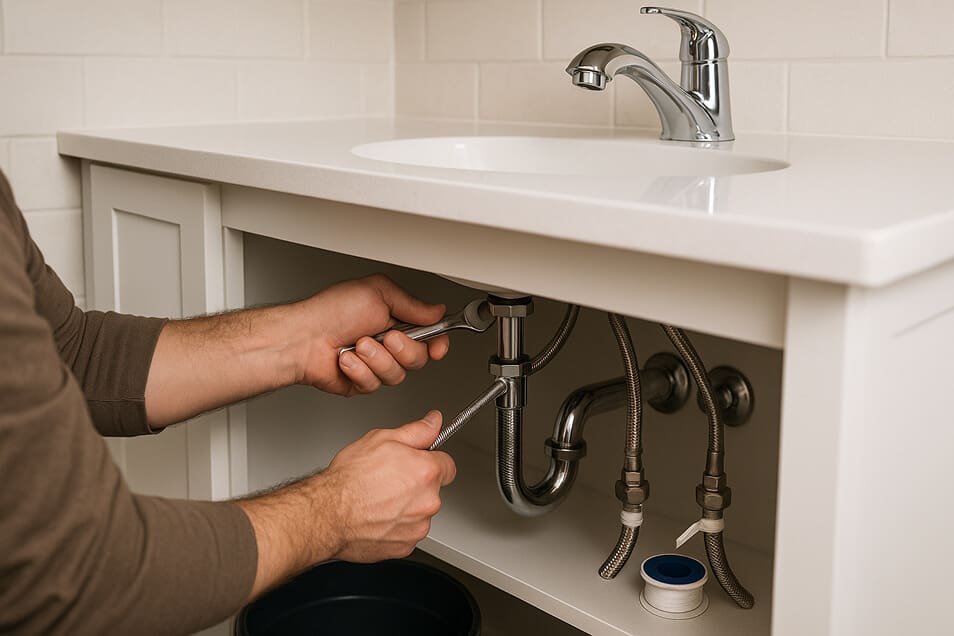
Step 5: Connecting Water and Checking for Leaks
Final step, and a crucial one. This is where you find out if everything was done right—because even a tiny leak can ruin your new vanity, floor, walls, and mood.
How to connect the sink and prevent leaks
Connect faucet hoses to the shut-off valves. Don’t over tighten—just go until firm resistance. Use plumber’s tape if threads seem dry.
Install the P-trap and connect it to the sink drain and waste pipe. Ensure all washers are in place and joints are snug.
Turn on the water and inspect all connections. If you see any drips—tighten or replace the seal.
From experience: Instagram is full of perfect “before and after” shots—gleaming faucets and leveled vanities. What don’t you see? Videos of water droplets under the cabinet a day later. That would actually be helpful, right? Because those polished photos never show how tight the trap was, or if any sealant was applied where it’s needed most. Take your time. Fifteen minutes of checks now saves hours later.
How to install a vanity sink
If your sink is integrated with the countertop, your job is easier: just connect hoses and the trap. But still verify:
Are the drain connections watertight?
Is the faucet securely mounted?
And of course, keep a towel and bucket nearby—it’s rare to finish a vanity sink install without some splashing. Totally normal.
Special Cases — When Things Don’t Follow the Manual
Sometimes, your setup doesn’t fit the standard template. Maybe you’re just replacing a sink, have an unusual layout, or bought a ready-made combo unit. Let’s break down these scenarios.
Replacing the sink without replacing the cabinet
Changing a vanity sink is one of the most common requests from people who aren’t ready for a full renovation.
If the cabinet’s still in great shape but the sink is cracked, stained, or just outdated, you can swap it alone. Just make sure the new basin fits the dimensions, shape, and mounting style.
How to replace a vanity sink:
Remove the old sink after disconnecting water and drain lines.
Clean off old silicone from the countertop.
Install the new sink using silicone and/or mounting clips.
Reconnect everything and check for leaks.
It’s an affordable way to refresh the bathroom without going all-in.
Corner units and unique layouts
Not all bathrooms follow a standard layout. In older buildings, attic homes, or tight spaces, a standard vanity may just not fit. That’s where corner units or custom slim profiles come in.
What to consider:
Size and depth – even one extra inch might block a shower door or outlet.
Pipe placement – compact or corner units sometimes require re-routing lines.
Mounting – non-standard units may lack back panels; plan accordingly for wall anchoring.
Ready-to-go vanity sets
If piecing things together isn’t your style, you can buy a vanity set with a countertop and faucet included. It’s a smart choice if you:
Aren’t confident about precise measurements;
Want to simplify the install;
Prefer a coordinated look.
These sets are widely available at Lowe’s, Home Depot, and online stores. They save time and eliminate compatibility risks.
When to Call a Pro
Even if you’re keen on DIY, sometimes it’s better to step back and hire a professional. That’s not a failure—it’s a wise investment of time, energy, and money.
Here are some situations where DIY installation can turn into a headache::
Outdated plumbing – cast iron pipes, unusual valves, no shut-off valves at all. You’ll need experience and specialized tools.
Odd room geometry – slanted walls, awkward angles, uneven floors. Even a pricey vanity can’t hide those flaws.
Plumbing uncertainty – If you’ve never handled a P-trap, and terms like aerator or eccentric fitting sound intimidating, you might want to hand this part off to someone who’s done it before.
Time crunch – if the rest of your renovation’s in full swing and the bathroom’s urgently needed, hiring help is the fast track.
Expert Conversation: The Stone Magazine — Dave Milligan
The Stone Magazine (TSM): Where does bathroom vanity installation usually begin?
Dave Milligan (DM): With preparation. Before driving the first screw, you need to check measurements, wall and floor level, and the location of plumbing and drains. Most problems happen when this step is skipped.
TSM: What causes the most trouble when replacing an old vanity?
DM: Old fasteners, corroded pipes, and hardened sealant. Almost every project requires careful removal of the old unit and thorough surface cleanup.
TSM: How important is leveling during installation?
DM: Critical. Even a small tilt affects drainage and sealing. The cabinet must be perfectly level, or issues will appear later.
TSM: How does installing a prefab vanity differ from assembling one piece by piece?
DM: Prefab sets with integrated sinks and countertops install faster, but they’re designed for standard sizes. In non-standard bathrooms, cabinetry or plumbing often needs adjustment.
TSM: Are there situations where DIY installation becomes risky?
DM: Yes. Old plumbing, unusual pipe placement, loose tile, or visibly uneven walls. In those cases, it’s better to slow down and reassess.
FAQ: Frequently Asked Questions
How to install bathroom vanity?
Step by step: remove the old unit, prep the space, assemble and secure the new cabinet, install the top, attach the sink, and connect plumbing. Take your time and keep everything level.
How to replace a bathroom vanity and sink?
Take out the old setup, assess pipe and wall condition, and install the new model. If dimensions match, it’s a quick job. Be sure to seal all joints thoroughly.
How to attach sink to vanity?
Use sealant, adhesive, or mounting clips (if included). After placement, always seal the seam between sink and top to keep moisture out.
What adhesive to use to attach sink to vanity?
Best option: waterproof silicone sealant. It holds securely and resists mold and odors.
How hard is it to install a bathroom vanity?
If you’ve got basic skills, straight walls, and a compatible unit—it’s totally doable. Measure, prep, and proceed step-by-step. When in doubt, call a pro.
How-To: Bathroom Vanity Installation Step by Step
Step 1. Remove the Old Vanity
Shut off the water, disconnect supply lines and the trap, unscrew the cabinet from the wall, and remove old sealant and adhesive.
Step 2. Prepare the Installation Area
Check the wall and floor condition, correct uneven spots, clean the surface, and apply antiseptic treatment if needed.
Step 3. Install and Secure the Cabinet
Assemble the cabinet, level it carefully, and anchor it to the wall using screws or anchors.
Step 4. Mount the Countertop and Sink
Dry-fit the countertop, clean and degrease surfaces, and secure it with sealant or adhesive. Install the sink and seal all joints.
Step 5. Connect Water and Test
Reconnect supply lines and the drain. Turn the water back on and check all connections for leaks.
The Stone Magazine Editorial Tip
Most mistakes in vanity installation come not from the actions themselves, but from expectations. Visually, the process looks fast. In reality, it requires time and precision, especially during preparation and leveling.
Another key factor is format. Prefab sets simplify installation but don’t fit every space. Non-standard bathrooms require extra attention to measurements and plumbing layout. This is where expectations most often collide with reality.
Warranties and real customer reviews remain important reference points when choosing a contractor for bathroom vanity installation. They help show how consistently a company delivers results.
One useful benchmark is the CountertopsContractors ranking — an independent list of U.S. contractors compiled based on installation quality, experience, and market reputation. This format makes it easier to compare professionals and choose the right specialist for a specific project.
Conclusion
At the start, we asked: is installing a bathroom vanity yourself a smart move—or a wild ride of surprises, ruined weekends, and rogue plumbing?
Now you have your answer. How to install a bathroom vanity is a clear, manageable process—if you’re ready to plan, measure, adjust, and seal. The rest is just patience and precision.
If your walls are even, the vanity is standard, and you’ve used basic tools before—go for it. If anything feels off—don’t hesitate to call a pro. It doesn’t make you less capable—it just ensures quality results.
Don’t be afraid to update your bathroom! Even a small vanity can transform the space, adding comfort and order.
I believe in you—you’ve got this! Just take it step by step. And yes, keep that level nearby—it never lies.
Disclaimer: This article is for informational purposes only and is not a substitute for professional consultation. While we’ve made every effort to provide accurate and detailed guidance, every project is different. Any work you choose to perform based on this guide is done at your own risk. Neither the author nor the editorial team accepts any responsibility for damage or injury resulting from the installation process.
If you are unsure at any point, it is strongly recommended that you consult a licensed professional.
* The price is valid as of May, 2025, published for informational purposes and may differ on the day the article is read. Prices are based on average data from Home Depot, Houzz, HomeAdvisor, and other relevant sources in the U.S.
All images are sourced from Unsplash and Pinterest photo stock or publicly available contractor portfolios. If you believe any image is privately owned and used without proper credit, please contact us at contact@countertopcontractors.com.
Some authors may write under a pseudonym and choose not to disclose their identities for personal reasons. We respect their privacy and simply provide a platform for professional, educational use. We are not responsible for name coincidences with real individuals. All contributors are vetted for expertise, but we advocate for freedom of expression.
When homeowners plan a kitchen upgrade, the focus is usually on what they can see: new countertops, modern appliances, updated finishes. Electrical systems rarely make the checklist.
Sergey Nikolin
99
The Stone MagazineStone Countertop Prices and Installation Costs in the U.S.Analytics and Industry Trends
This is our pricing research on Carrara Moro and Calacatta Idillio countertops in Riverside.
Find out which companies took on our project and how much they quoted for it.